Friday, March 29, 2013

Hey, You! Follow Along with Me, Ok?

How do you follow your favorite blogs? If you use Google Reader, then I’m sure you’ve already had the news broken to you that Google Reader is going away as of July 1. Sad, sad day.

If you aren’t sure what Google Reader is, that’s ok. Basically, it’s a place to store subscriptions to blogs and websites where you can keep up with the new things being posted. I love it because I’m able to read all of my favorite blogs by going to just one place, instead of having to bookmark them and visit to see if there are any new posts up. Google Reader automatically shows me which blogs have new posts, and I can view those posts directly in Google Reader. It is fantastic.

In place of Google Reader, I’ve switched over to Bloglovin’. Bloglovin’ does pretty much the same thing as Google Reader.

bloglovin'

So far I’m pretty happy with it. It does what I want it to- it lets me keep my blogs all in one place for easy reading.

If you have a bloglovin’ account, I’ve added this blog on there. Click the button below to follow along with me!

Follow on Bloglovin

While we’re at it, if you’re on Pinterest, I hang out there as well.

bloglovin'

I love Pinterest. It was just what I needed. Anyone else have bookmark folders that look like this:

bookmark bar

Where, if you go up or down on that list, the bookmarks go on and on and on…? Pinterest has been fantastic. Instead of adding another bookmark to get lost and sucked away to the deep abyss of my incredibly long list of links, I can add it to my Pinterest account. There I can visually see what the link is, and I can add different boards to organize and categorize my pins, so I can easily find them again. So. Great. Plus what I pinned is shared with my friends, and I can see and repin things my friends have pinned, giving me added exposure to great ideas I may not have seen otherwise.

So, if you’re on Pinterest, click the link below to follow along with me, and see what interests me! 

Friday, March 22, 2013

[Tutorial] Reverse Applique Love Pillows

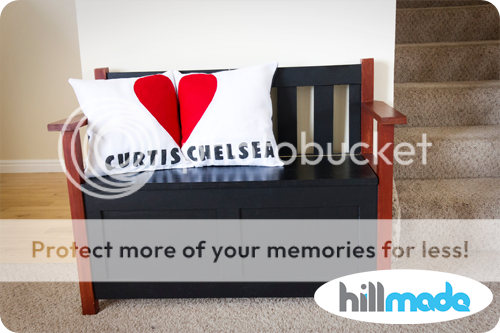
I kind of dropped the ball on Christmas this past year. I was due to have Keira, who was born 12 days before Christmas, and I was feeling extremely unmotivated. I really wanted to sew for family members, but just couldn’t get myself into it. I had ideas for my brother, Curtis and his wife, Chelsea, but I couldn’t decide on anything.

I still really wanted to make something for them. I was thinking home décor, of some sort. So, when I saw these his and hers pillowcases, I got an instant idea and knew that’s what I wanted to sew.


Reverse applique love pillows! I love them. I think I'll have to make a pair for our home as well.

What is reverse applique? Applique is stitching a design cut out from fabric onto another piece of fabric. Reverse applique is cutting out a design from the main fabric and having a secondary fabric sewn to the underside so that it peeks through the cutout. That is what I did. Let me show you how.


Thursday, March 14, 2013

[Recipe] Pineapple Sour Cream Pie

I know I said I was hoping to have pictures (and a tutorial) posted of the pillows I recently made, but I made a mistake. I forgot about Pi Day. (Gasp!)

Seriously? How did I forget!? I have celebrated Pi Day every year since 2004, during my freshman year of college. 9 straight years of Pi Day festivities. Pi Day is one of my absolute favorite holidays. It comes right after Christmas and Thanksgiving (including Canadian Thanksgiving- another tradition that started in college.)

Today is Pi Day! 3.14. (It’s also the birthday of my long time friend, Tiffany. Happy birthday Tiffany!) To celebrate, I want to share with you my favorite pie. Pineapple Sour Cream Pie.


Don’t let the name fool you, it is so good. I’m not a sour cream eater, but I love this pie. Seriously. I make it every Thanksgiving, and for every Pi Day, without fail. Since marrying Kyle, I also make his family’s favorite, Chocolate Pudding Pie. Last year I made individual ones for Kyle’s coworkers. Check it out.

Anyway… On to business.

Pineapple Sour Cream Pie

9” pie crust, baked

filling:
3/4 c. sugar
1/4 c. flour
1/2 tsp. salt
1 c. sour cream
1 tsp. lemon juice
1 can crushed pineapple, undrained
2 beaten egg yolks (make sure to save the whites- you need them for the meringue)

meringue:
2 egg whites
1/2 tsp. vanilla
1/4 tsp. cream of tartar
1/4 c. sugar

For the filling: In a saucepan, mix the sugar and flour. Add everything else except the egg yolks. While stirring, let it cook until thick. Once it is thick, add a few spoonfuls of the mixture to the egg yolks and stir. Add the egg yolks to the entire mixture. Cook it a little bit longer. Let the filling cool.

For the meringue: Using an electric mixer with the whisk beaters, beat the first 3 ingredients to soft peaks. Add the sugar and beat until it is completely mixed.

Pour the filling into a baked pie crust. Spread the meringue on top.

Bake the pie at 350 degrees for 12-15 minutes.


Enjoy! Happy Pi Day!

(The pillows post is coming next week. I pinky promise!)

Thursday, March 7, 2013

Toothbrush-a-saurus!

In my last post, I showed some fabric I had waiting to be cut and sewn. I made some fun pillows with it, that I’m excited to share with you. I just finished them up yesterday. It took me a lot longer to get it done than I had expected. Mostly because life happened and I just couldn’t get to it as often as I would have liked to. But, they are finished and I’m hoping to share it with you sometime next week!

Until then, check out this awesome idea for a toothbrush holder I ran across on Pinterest.

source: parents.com

I was cleaning the bathrooms today and kept thinking about what an awesome idea this is. I just love it! Someday when I get around to organizing the girls’ bathroom I plan to do something like this for them. So fun!

Friday, February 22, 2013

I Have a Project in My Head and Felt on My Table.

[hillmade] coming soon

I picked up some felt at JoAnn’s the other day. I’m excited for what I’m going to do with it. I hope it turns out like how it’s pictured in my head. Prepare for some sewing to come. Yipee!

michael_miller_house_designer_mod_pod_in_malibuMod Pod in Malibu from Michael Miller

P.S. Isn’t this Michael Miller print so fun!? I have no idea what I would ever use it for, but I just love it. I need to think of something to do with it so I can buy some.

Wednesday, February 20, 2013

Sewn Sandwich Bag Toppers

Kyle and I team teach the 12-13 year olds in Sunday School at church. They are fun kids who love to talk (mostly off topic.) We really like to have fun with them and get to know them. We’ve thrown a few homemade pizza parties at our house recently, which are some work, but totally worth it.

I decided to bring in treats this past Sunday. I made my favorite chocolate chip cookies. I wanted to tie them into the lesson somehow, but couldn’t think of anything. So I gave them a quote that went along with the lesson. I decided to put two cookies in a sandwich bag (one for each child), typed up the quote, printed it on cardstock, and sewed it onto the tops of the sandwich bags.

[hillmade] sandwich bag toppers

This is such an easy way to jazz up packaging goodies without a lot of money or extra crafty things. I used the same idea for party favors for Hailey’s friends who came to her birthday party. That time I used clear plastic sacks I found in the party aisle at Target.

[hillmade] sandwich bag topper_cropSorry the stitching is so hard to see.  I used light blue thread that was already loaded on my machine. And I did this in the evening, so the lighting wasn’t very good. Excuses, excuses. I know… :)

Seriously, this is so fun. I think just because it’s quick, easy, and gives good results. I used InDesign, you can use Word, or whatever program you’re comfortable with. Just make your text area the width of your bag, I think my sandwich bags were about 6 1/4 inches. I made them 4 inches tall, so when it is folded over the top of the bag it is 2 inches on either side. Keep your text on the lower 2 inches (the upper 2 inches will be on the back), and leave about 1/2 inch on the bottom for stitching. Print it out on cardstock, cut it out, fold it in half, insert the top of the sandwich bag all the way into the fold and sew a straight line.

[hillmade] sewing sandwich bag topper2

I sewed about 1/4 inch away from the edge.

[hillmade] sandwich bag toppers2

Voila! Super cute packaged cookies.

Thursday, February 14, 2013

[Printable] 4x6 Thank You Cards

We had a baby girl join our family two months ago, yesterday. Yay! We had many people help us out by providing meals and giving gifts to baby girl and her sister. We really feel so blessed to have such great friends and family.

Of course I want to thank each of them for what they have done for us. I finally made some thank you cards to mail out. I feel pretty good that I have them done after just two months. With Hailey, our oldest, I didn’t mail anything out until she was 5 months old! Better late than never, eh?

thank you 4x6

The cards are sized 4x6. They are printed on the front, and blank on the back so I can write a message. I am having them printed at my old home, the copy center at BYU in Provo, UT. I worked there for a total of about 6 1/2 years (off and on a little bit, part-time as a student and later full-time as a non-student). I seriously miss the copy center some days. I have an odd attachment to copy machines and printers.

ANYWAY… I thought I’d share the fruits of my labor with you. Lucky you! :) The file is an 8.5x11 PDF with two 4x6 cards per page (2-up), complete with bleeds and crop marks. Click on the image below to be taken to Google Drive where you can download the file.
[hillmade] thank you 4x6_2-up
Enjoy! And thank you for following along with me!
Related Posts Plugin for WordPress, Blogger...